Most of the time, your Tesla side cameras won’t work because of a loose connection on the camera board, a bad connection, problems with your USB, or moisture, dirt, or other things on the camera surfaces. The best way to fix it is to check the connection between the cameras or reset the settings on your camera.
Tesla automobiles are jam-packed with intriguing and practical technologies, such as a side camera operated by the computer software in the car. But as everyone who has worked with a computer previously is aware, glitches can happen from time to time, and sadly, Teslas are no exception.
Of course, if your Tesla Dashcam breaks down, you can experience different issues. You need not fear, though, since a list of potential fixes for faulty Tesla side cameras is provided below.

You Can Skip To Sections Here
- 1 Some of the known causes why a Tesla’s side camera won’t be working
- 2 How to fix a Tesla Side Camera that isn’t working
- 2.1 1. Verify the TeslaUSB Type
- 2.2 2. Divide TeslaCam USB into Two Partitions
- 2.3 3. Free your USB Dashcam Space
- 2.4 4. Reboot The Scroll Wheel
- 2.5 5. Reboot The Top Button
- 2.6 6. Steering Wheel and Brake Pedal Reboot
- 2.7 7. Wipe out Trip Information and Past Locations
- 2.8 8. Complete a factory reset
- 2.9 9. Disconnect USB devices
- 3 Cleaning the Tesla Side Camera
Some of the known causes why a Tesla’s side camera won’t be working
- Manufacturing issues.
- weak connection
- There could be a fault with the TeslaCam USB
They include:
1. Manufacturing issues.
There is a global shortage of parts, and a manufacturing problem is to blame for the failure of several side cameras on the 2021 Tesla Model 3. Drive Tesla has received information from multiple owners, and the problem is permanently restricted to just one of the side repeater cameras.
The left or right side Tesla camera can be defective. Therefore, the issue is not just restricted to one side among owners.
There are two ways that the issue is expressed. When watching a video on the in-car display, there is a brief flickering of the image, which seems to be less often than the first. The more typical situation is a screen that is always black, which shows that the camera is entirely inoperative.
Moreso, a user on the r/TeslaMotors subreddit, claims that Tesla now provides some customers with free replacement side (DashCam) cameras.
2. A weak connection
Tesla Service claims that a weak connection on the camera panel is the root of the issue with the side cameras, necessitating the replacement of the entire unit. Black side repeater cameras are currently in low supply because Tesla released the updated Model 3 with standard black trim. The Model 3 has a rearview camera mounted over the back license plate.
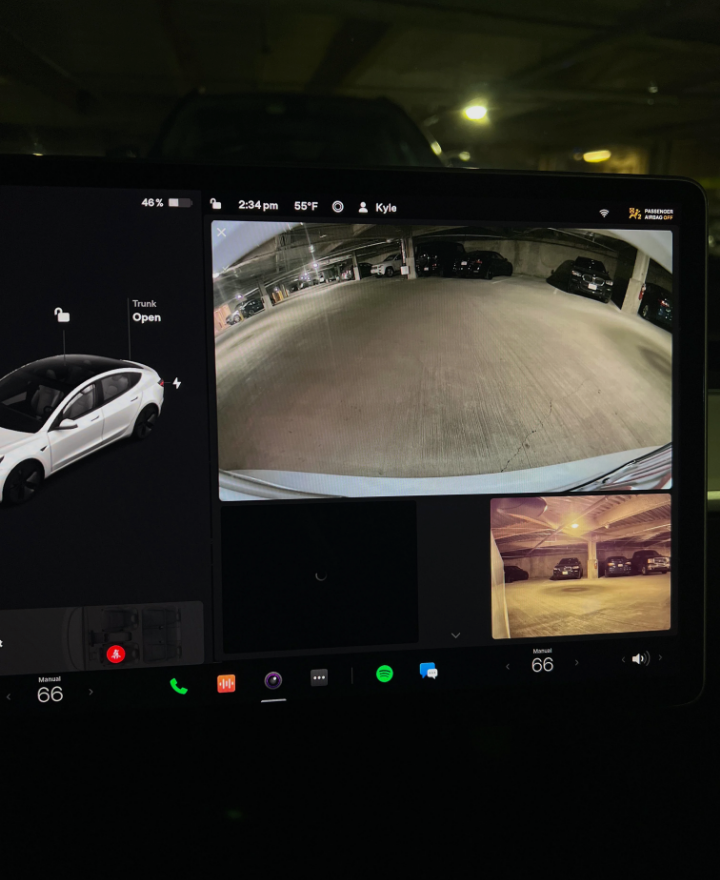
In Model 3, side cameras’ views are also shown (if equipped). Only swipe up or down to see or hide the side camera views.
3. There could be a fault with the TeslaCam USB
Sadly, a few Tesla Dashcam owners have encountered various issues while using this driving recorder. In reality, the TeslaCam USB may be to blame for this issue in most cases rather than the physical problems with the side cameras themselves. Your Tesla Dashcam’s icon may display an X if it stops functioning. In this instance, the disk most likely became corrupted in the 39.7 update procedure or was already full.
How to fix a Tesla Side Camera that isn’t working
Now that we have seen what might cause your Tesla Side Camera (DashCam) to stop working, it is pertinent that we look at the solutions for fixing your DashCam.
- Verify the TeslaUSB Type
- Divide TeslaCam USB into Two Partitions
- Free your USB Dashcam Space
- Reboot The Scroll Wheel
- Reboot The Top Button
- Steering Wheel and Brake Pedal Reboot
- Wipe out Trip Information and Past Locations
- Complete a factory reset
- Disconnect USB devices
1. Verify the TeslaUSB Type
If the Tesla Side Camera error message appears, you should check the USB driver type first. Not only Tesla is affected by the USB problem, but so are other driving recorders that need an extra USB to save data.
In general, USB 2.0 works quite well, but Tesla recommends USB 3.0, 3.1, and 3.2 because of the 3.x kinds’ propensity to accelerate tasks like reading and formatting.
Furthermore, the workloads generated by driving recorders such as TeslaCam are insufficient to support the primary consumer drivers.
If your present TeslaUSB memory stick doesn’t comply with the specifications above, switch it out for one that can handle the data demands made by TeslaCam and Sentry Mode.
2. Divide TeslaCam USB into Two Partitions
Are you storing music and dashcam data on the same USB drive? You should know that you must store your Tesla V9 Dashcam and music on different USB sticks. This could be irritating. Your dashcam won’t function if you exclusively use a USB disk for audio. However, if you use two USB ports simultaneously, you won’t have a USB port for charging your phone.
Most customers decide to split the USB into two parts to solve this problem.
Therefore, you should check if you have a partition for Dashcam if your Tesla Dashcam doesn’t function when you only have a USB for music.
3. Free your USB Dashcam Space
A Tesla Dashcam that isn’t working can occasionally be fixed by deleting specific files from the memory stick. The Tesla Dashcam will keep recording after the USB is full but won’t store anything. You must therefore take measures to make space.
Also, the recording files sometimes need to be deleted because you will automatically keep the old ones from being thrown away.
Simply take the Dashcam USB out of the recorder and plug it into your computer. Open the Dashcam folder and select the files you want to delete. You should get rid of the files in the SavedClips folder because they contain old data recordings.
Also, when the USB stick is taken out or the car is turned off, the last file that the Tesla Dashcam was actively capturing is usually corrupted and can’t be read.
When the USB device is turned back on, the file system check (FSCK) starts and finds the bad sectors in the final file. The restored files will then be saved on the USB drive’s root instead of in the TeslaCam folder, with the letters FSCK in their names.

These solutions come in the form of a user guide. They include:
4. Reboot The Scroll Wheel
This usually resolves the problem by soft-rebooting your Tesla DashCam. If necessary, this can be carried out while driving. The car’s screen will go dark, but it will continue to run normally.
Press the scroll wheel buttons for 10 seconds while holding them down, then let go to reboot the scroll wheel. As the system reboots, the touchscreen will go dark for roughly a minute.
5. Reboot The Top Button
Only owners of a Tesla Model S or Model X can reboot using the top button. Press and hold the two buttons above the scroll wheels on the face of the steering wheel for 10 seconds to restart all the buttons. DashCam will be reset after doing so
6. Steering Wheel and Brake Pedal Reboot
During the reboot process, you must park the car, and all doors must be completely closed.
Keep your foot on the brake pedal and press it down throughout the operation.
Pull down the scroll wheels if you have a Model 3. Press and hold the scroll wheels and the two buttons above them if you have a Model S or Model X. The touchscreen will go black for roughly a minute as the system reboots if you keep pressing the buttons for at least 10 seconds.
Hold the pedal down and the buttons down after the screen goes black until the dash cam comes back on.
7. Wipe out Trip Information and Past Locations
To make the side camera more stable and reliable, you should clear the trip information from your Tesla’s computer. Even though it might not fix your side camera issue, it might be able to prevent similar problems from happening in the future.
If you swipe often-visited places off the list, the satellite navigation data for those places will be erased. This will enhance the stability of the system.
8. Complete a factory reset
Tesla does not recommend it; however, if you are stuck and can’t get assistance from a technician, you can try doing a factory reset on your DashCam. The same steps as in “Complete Power Down and Reset” should be followed to perform a factory reset. Select “Factory Reset” rather than “Power Off,” then carry out the remaining instructions.
9. Disconnect USB devices
By unplugging USB devices, you can keep outside factors from making your side camera stop working. Large data sets, like music files from a flash drive, can be too much for the car’s dashcam to handle. The system will be more stable if the volume of data is decreased.
Cleaning the Tesla Side Camera
Let us now look at some ways to maintain your Tesla side camera.
- The Tesla side camera lens needs to be spotless and clear of objects to provide a clear image. Spraying water over the camera lens with a squeeze bottle or power washer will clear away any accumulation of dirt or debris.
- Remember not to use your hands or a cloth to try and clean off dirt or debris from an exposed lens. When rubbed against while wiping, these particles might harm the lens’s surface.
- Additionally, avoid using abrasive or chemical-based cleansers. The chemicals in the cleaners can harm the lens surface if you do this.
- Avoid using tight-napped or scratchy fabrics, such as washing mitts for your Tesla Side Camera. It is advised to use a good microfiber cleaning cloth.
.